 Webmail
 Dynamic Mail
Filters
Filters are a way for you to setup your email to perform automatic actions on messages as soon as they arrive. They are very helpful in the fight against spam, but are also useful for automatically sorting messages, when you go on vacation, or when you need messages forwarded to another email address.
Viewing your Filters
To view your filters, make sure the Mail option is expanded in the Tree Area, and click Filters. This will bring up a page showing you your current filters:
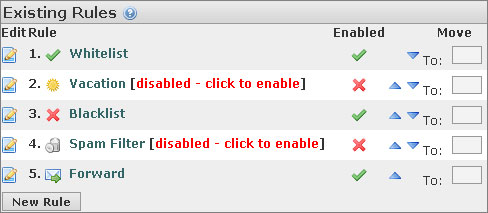
The Whitelist
The Whitelist is a list of email addresses that, no matter what our Spam filters may decide, mail from these contacts will always come through to your Inbox. Our spam filters are automated. They use a lot of information about incoming messages to try and determine if they are legitimate emails or if they are spam. However, sometime the Spam filters make mistakes, and accidentally block legitimate messages. Whitelisting the email address of a person accidentally being blocked will correct this problem.
To add email addresses to the Whitelist, click the Whitelist link in the list of Filters, or in the Button Area, click the Whitelist button with the ![]() icon. A new page with a textbox will come up. Simply type all the email addresses you want to Whitelist into this textbox. You can also whitelist people directly from the Inbox or from a specific messages. From the Inbox, select which message(s) whose sender(s) you want to add to the Whitelist. Then click the Whitelist link in the upper-left corner. From a message itself, there is also a Whitelist link in the upper-left corner you can click, which will add the sender of the message to your Whitelist. Contacts you have added to your Address Book are automatically Whitelisted.
icon. A new page with a textbox will come up. Simply type all the email addresses you want to Whitelist into this textbox. You can also whitelist people directly from the Inbox or from a specific messages. From the Inbox, select which message(s) whose sender(s) you want to add to the Whitelist. Then click the Whitelist link in the upper-left corner. From a message itself, there is also a Whitelist link in the upper-left corner you can click, which will add the sender of the message to your Whitelist. Contacts you have added to your Address Book are automatically Whitelisted.
The Blacklist
The Blacklist does just the opposite task as the Whitelist. It blocks mail from unwanted addresses. Again, our Spam filters can make mistakes, and accidentally let spam messages come through. Adding email addresses of spammers to the Blacklist will help you fight spam even more.
To add email addresses to the Blacklist, click the Blacklist link in the list of Filters, or in the Button Area, click the Blacklist button with the ![]() icon. A new page with a textbox will come up. Simply type all the email addresses you want to Blacklist into this textbox. You can also blacklist people directly from the Inbox and a specific messages. From the Inbox, select which message(s) whose sender(s) you want to add to the Blacklist. Then click the Blacklist link in the upper-left corner. From a message itself, there is also a Blacklist link in the upper-left corner you can click to add the sender to your Blacklist.
icon. A new page with a textbox will come up. Simply type all the email addresses you want to Blacklist into this textbox. You can also blacklist people directly from the Inbox and a specific messages. From the Inbox, select which message(s) whose sender(s) you want to add to the Blacklist. Then click the Blacklist link in the upper-left corner. From a message itself, there is also a Blacklist link in the upper-left corner you can click to add the sender to your Blacklist.
Vacation
The Vacation filter can be used to send people messages when you're away and not able to check your email. To set it up, click the ![]() Vacation link in the list of Filters. A new page will come up with drop-down lists to set the start and end dates of your vacation, and textboxes to write the message a person will receive. Under the Advanced Settings tab, you can set your e-mail address (which is filled in automatically for you), the address of people you don't want to receive messages, whether bulk or list messages (such as a newsletter) should receive a reply, and the number of days between replies.
Vacation link in the list of Filters. A new page will come up with drop-down lists to set the start and end dates of your vacation, and textboxes to write the message a person will receive. Under the Advanced Settings tab, you can set your e-mail address (which is filled in automatically for you), the address of people you don't want to receive messages, whether bulk or list messages (such as a newsletter) should receive a reply, and the number of days between replies.
Once you have entered all the information, click the Save and Enable button to activate your Vacation filter.
Spam Filter
The Spam Filter is one of our main tools we use to fight spam. The Spam Filter analyzes every message that is sent to you. It looks for HTML, advertising, keywords, the number of people the message was sent to, and a lot of other factors. After the Spam Filter is finished analyzing a message, it assigns the message a spam score. The more spam-like a message is, the higher its spam score will be.
To change the settings on your Spam Filter, click the ![]() Spam Filter link in the list of Filters. A new page will come up. Here you can set the limiting spam score, and the folder that receives the spam. By default, the limiting spam score is 5. A message with a spam score higher than this number will get marked as spam, and moved to the spam folder. If you notice you are getting a lot of spam, consider lowering this number. If you notice a lot of messages are getting blocked, considering raising this number. It is probably best to select the Spam folder as the folder to receive spam.
Spam Filter link in the list of Filters. A new page will come up. Here you can set the limiting spam score, and the folder that receives the spam. By default, the limiting spam score is 5. A message with a spam score higher than this number will get marked as spam, and moved to the spam folder. If you notice you are getting a lot of spam, consider lowering this number. If you notice a lot of messages are getting blocked, considering raising this number. It is probably best to select the Spam folder as the folder to receive spam.
Once you have entered all the information, click the Save and Enable button to activate your Spam Filter.
Forward
If you have an email address with another provider that you use more often, but don't want to miss getting your messages from your evenlink.com email address, you can setup the Forward filter. Click on the ![]() Forward link in the list of Filters. You'll be brought to a new page with two options. One is a checkbox, asking if you want to keep a copy of the message on our server. This might be good if you want to have backups of the messages. The next option is the address(es) you want us to send the message to.
Forward link in the list of Filters. You'll be brought to a new page with two options. One is a checkbox, asking if you want to keep a copy of the message on our server. This might be good if you want to have backups of the messages. The next option is the address(es) you want us to send the message to.
Once you have entered all the information, click the Save and Enable button to activate your Forward filter.
Using Filters to Sort Mail
You're not limited to our own pre-defined filters. You can create your own filter to deliver, redirect, delete, or reject messages completely. To create a filter, go back to the list of filters, and click the New Rule button in the lower-left. The following page will come up:
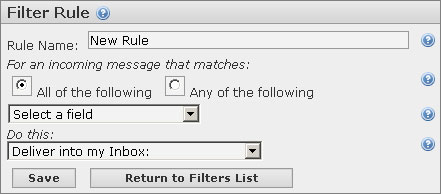
First you can type a name for the new rule, and then select whether all the options you're about to enter should be considered a match, or any of the options. Then you need to set which fields the Filter should look through, and what the Filter should do when it finds a match. The basic idea is that you select a field, describe how to determine a match, and then what to do if an email matches your description.
The most common fields you would probably set are the To, Subject, Sender, and From fields. In any case though, click the Select a Field drop-down list, and select which field you want to search through. The page will change, showing you the field you selected with a new drop-down list, a textbox, and a Case Sensitive checkbox. In the new drop-down list, you select how the text you're about to enter should be interpreted by the filter. The most common options you would use are Contains and Doesn't Contain. Then in the textbox, you type the text the Filter should search for.
After describing how to determine a match, you need to tell the Filter what to do. You can set it to "Deliver into my Inbox", which doesn't do much since it would have gone to your Inbox anyway (unless it was being blocked by the spam filter). You can also set it to deliver to another folder. Clicking this option will change the page, giving you another drop-down list to select which folder to deliver the message to. You can also select to delete the message completely, or reject it with a reason you type in. You can also choose to redirect the message, which will send it to another recipient.
Once you've finished setting up the new rule, click the Save button in the lower-left corner to add the filter.
As an example, lets say you want all emails from your coworkers to go to a seperate folder called Work, rather than your Inbox, and everyone in the company has an email address with @company.example.com at the end. First, you'd have to create the new folder. If you're not sure how to do this, you may want to go back to the Folders section of the guide for help. Then you would go to the Filter List and click the New Rule button. You would then click the Select a Field drop-down list, and click the "From" option. Leave "Contains" in the second drop-down list, and type "@company.example.com" in the textbox. Then click the Save button in the lower-left corner.
Turning Filters On/Off
To turn a filter on or off, go back to the list of filters. To disable a filter, click the ![]() , to turn it into a
, to turn it into a ![]() . To enable a filter, click the
. To enable a filter, click the ![]() , to turn it into a
, to turn it into a ![]()